Proxmox-for-Channels: Step-by-Step for Virtualizing Everything

There seems to be a group of us now using (or planning to use) Proxmox as a platform for everything Channels DVR related and beyond. As such, I thought it might be nice to have a thread dedicated to those that are on the path to "virtualizing everything" (or almost everything anyway). In addition, I'm probably not the only one using Proxmox 7 (for my Channels stuff), and is making the move to Proxmox 8 before support ends on 2024.07.31

In my case, I have the luxury of two identical 2U systems, so one can be production and the other lab. And in this case, I'm building out the lab system to become the production system, running Proxmox 8 and implementing a few changes from when I built my first Proxmox server around this time last year.

I'll add to this thread as I go, and do my best to document things to know, particularly as they relate to using Proxmox in a Channels DVR environment including the many great Docker-based extensions.

Installing Proxmox:

After installing Proxmox, I've had good success using the Proxmox VE Post Install script found here:

This will set your repositories correctly for home (free) use, remove the subscription nag, and bring Proxmox up-to-date -- along with a few other things.

If you have a second Network Interface Card, which is a good idea in a Proxmox installation (either 2.5 or 10Gbps if possible), now's the time to add a Linux Bridge to the physical NIC, so it'll be available in your virtual environments. In my case, a 2.5Gbps Ethernet port is my "administrative port", and was setup during the installation. The 10Gbps PCIe card I installed, will be the card I use for my virtualizations. Here I've added a bridge called vmbr1 that's connected to my physical enp6s0 port:

The setup for these bridges is very simple, as you typically don't specify anything except the bridge and port names:

screenshot-pve2_8006-2024.05.25-14_39_30

If you're a Tailscale user, this is a good time to install it -- and also to emphasize that we'll be installing very few additional packages to Proxmox itself. Generally with a hypervisor like this, one wants to keep it as "stock" as possible, with any needed applications installed in LXC containers or Virtual Machines.

The Tailscale convenience script works nicely here:

with this command:

curl -fsSL https://tailscale.com/install.sh | sh

Execute a tailscale up followed by the usual authorization process.

Installing a Proxmox LXC for Docker containers:

To install an LXC container first thing you need to do is to download a template for it. This is done by clicking on "local" in the Proxmox WebUI, followed by "CT Templates". I like using Debian, as Proxmox and so many other things are based on it:

screenshot-pve2_8006-2024.05.25-14_45_40

Go ahead and create your Debian CT, and use your best judgement on what resources to allocate based on what's available CPU, RAM and Disk-wise on your chosen hardware. Be aware it's OK to over-allocate on vCPUs, but not on RAM or Disk. You can go back and tweak settings later if needed.

Here's what I'm doing for my first LXC I'm calling "channels", as far as Resources and Options go:

screenshot-pve2_8006-2024.05.25-14_54_02

screenshot-pve2_8006-2024.05.25-14_54_35

I'll circle back later and setup the start and shutdown order once I have a few more virtualizations completed.

No need to start your LXC yet, as we're going to make a couple of changes to the "conf" file for this LXC to support Tailscale and to pass our Intel processor's integrated GPU through to have it available for transcoding.

Note the number assigned to your newly created LXC (100 in my case) and go to the shell prompt for your pve:

Change directories to /etc/pve/lxc, followed by nano 100.conf:

root@pve2:~# cd /etc/pve/lxc
root@pve2:/etc/pve/lxc# nano 100.conf

The last 9 lines above are the ones we're going to be adding to support Tailscale and Intel GPU passthrough:

For Tailscale (OpenVPN or Wireguard too):

lxc.cgroup2.devices.allow: c 10:200 rwm
lxc.mount.entry: /dev/net/tun dev/net/tun none bind,create=file

For Intel Quicksync:

lxc.cgroup2.devices.allow: c 226:0 rwm
lxc.cgroup2.devices.allow: c 226:128 rwm
lxc.mount.entry: /dev/dri/renderD128 dev/dri/renderD128 none bind,optional,create=file 0, 0
lxc.mount.entry: /dev/dri dev/dri none bind,optional,create=dir
lxc.hook.pre-start: sh -c "chown -R 100000:100000 /dev/dri"
lxc.hook.pre-start: sh -c "chown 100000:100044 /dev/dri/card0"
lxc.hook.pre-start: sh -c "chown 100000:100106 /dev/dri/renderD128"

Go ahead and start your LXC now, and you can quickly verify the presence of /dev/net/tun and /dev/dri:

root@channels:~# ls -la /dev/net /dev/dri
/dev/dri:
total 0
drwxr-xr-x 3 root root        100 May 25 13:01 .
drwxr-xr-x 8 root root        520 May 25 23:00 ..
drwxr-xr-x 2 root root         80 May 25 13:01 by-path
crw-rw---- 1 root video  226,   0 May 25 13:01 card0
crw-rw---- 1 root render 226, 128 May 25 13:01 renderD128

/dev/net:
total 0
drwxr-xr-x 2 root   root         60 May 25 23:00 .
drwxr-xr-x 8 root   root        520 May 25 23:00 ..
crw-rw-rw- 1 nobody nogroup 10, 200 May 25 13:01 tun

Go ahead and update your LXC's distro, and install curl:

apt update
apt upgrade
apt install curl

Now, install Tailscale in the LXC using the same convenience script we used for Proxmox. Do a tailscale up and authorize in the usual way.

Next, let's install Docker, also using a convenience script:

It's just two commands:

curl -fsSL https://get.docker.com -o get-docker.sh
sh get-docker.sh

And, to confirm installation

root@channels:~# docker version
Client: Docker Engine - Community
 Version:           26.1.3
 API version:       1.45
 Go version:        go1.21.10
 Git commit:        b72abbb
 Built:             Thu May 16 08:33:42 2024
 OS/Arch:           linux/amd64
 Context:           default

Server: Docker Engine - Community
 Engine:
  Version:          26.1.3
  API version:      1.45 (minimum version 1.24)
  Go version:       go1.21.10
  Git commit:       8e96db1
  Built:            Thu May 16 08:33:42 2024
  OS/Arch:          linux/amd64
  Experimental:     false
 containerd:
  Version:          1.6.32
  GitCommit:        8b3b7ca2e5ce38e8f31a34f35b2b68ceb8470d89
 runc:
  Version:          1.1.12
  GitCommit:        v1.1.12-0-g51d5e94
 docker-init:
  Version:          0.19.0
  GitCommit:        de40ad0

Next, we'll install Portainer, and I'm going to use the :sts (Short Term Support) tag for this, as there's currently a slight issue with Docker and Portainer that affects getting into a container's console from the Portainer WebUI. Normally you'd want to use the :latest tag, and I'll switch to that once this issue is ironed-out:

docker run -d -p 8000:8000 -p 9000:9000 -p 9443:9443 --name portainer \
    --restart=always \
    -v /var/run/docker.sock:/var/run/docker.sock \
    -v portainer_data:/data \
    cr.portainer.io/portainer/portainer-ce:sts

You can now access Portainer at http://channels:9000 (assuming your LXC is named "channels" and you're using Tailscale with MagicDNS). If you need the IP, you can do a hostname -I from the LXC console to get it.

There's a clock on Portainer configuration, so you should go to its WebUI promptly and setup your admin password at least, or you'll need to restart the container to restart the initial config clock.

OK, so that's it for baseline configuration. I'll do some additional posts in coming days on setting up a Windows VM (in my case for DrivePool), along with adding Channels DVR and OliveTin as Docker containers.

3 Likes

The next task in the chain is to setup some sort of virtual NAS-equivalent for managing recordings and other personal media across one's LAN, tailnet and potentially beyond.

Personal preference, experience and how your data is stored currently all factor into making a decision on what to use. For me, I migrated from Windows Home Server 2011 with its easy to use approach to shared storage, to Windows 10/11 and DrivePool (which has a similar feature set).

This has worked well for me, so I'm going to carry on with that by setting up a Windows 11 VM with DrivePool. This also allows me to continue with Veeam Backup & Replication, which I've also used since migrating from WHS2011.

So here are the steps for setting up a Windows 11 VM:

First decide what you want to use for your "installation media". Proxmox supports uploading .iso files for creating VMs, but you can also use USB media, which is what I'm going to do. Using Rufus to create a bootable USB from .iso, gives you some options for making the installation faster, along with eliminating a few things required during a standard installation. For me, this means eliminating the requirement for a Microsoft account, and setting the name of the local account -- along with declining all opt-ins.

Also, you'll want to download the VirtIO drivers from Proxmox, and then upload them to pve. I typically choose the "latest stable":

https://pve.proxmox.com/wiki/Windows_VirtIO_Drivers

Here are the steps to adding a Windows VM to use as a virtual NAS with DrivePool:

Name your VM now, and later we'll circle back to set startup and shutdown options:

Since we're going to use USB installation media we'll choose "Do not use any media", but we will add the VirtIO drivers as an additional mounted drive:

VM System settings should look like this:

Set Disks similar to this. Note current Windows 11 installations require 64GB minimum:

For CPUs, I'm using 8 cores as I have 32 available (threads = vCPUs in Proxmox):

You can over-provision on cores if needed. "host" CPU type gives best performance for Windows:

Don't over-provision on memory, so set this based on what you have available. 4GB is the absolute minimum, 8GB is better, and up from there if you can spare it:

Ideally, you'll have at least one additional Ethernet port (setup previously as vmbr1), and also ideally this will be a 2.5Gbps or higher speed port to support multiple virtualizations:

Confirm your settings, and be sure to uncheck "Start after created":

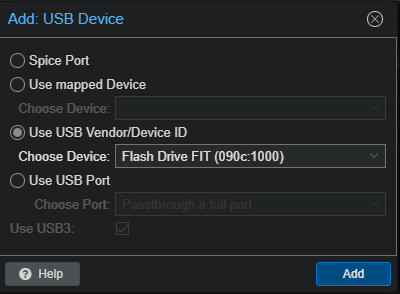
Next we'll insert our USB flash drive, and add it as USB device to our newly created VM:

screenshot-pve2_8006-2024.06.02-16_08_52

And finally, we'll tweak the boot order to put the USB flash drive first and uncheck most other boot options:

screenshot-pve2_8006-2024.06.02-16_10_04

Start the VM, and you'll see the familiar Windows setup. When you get to the point of choosing a disk to install Windows on, you'll need to add the VirtIO SCSI amd64\w11 driver:

screenshot-pve2_8006-2024.06.02-16_11_52

screenshot-pve2_8006-2024.06.02-16_12_50

Once that's done, you'll have a drive to install to:

screenshot-pve2_8006-2024.06.02-16_13_37

After the installation is complete you can stop the VM to remove the USB flash drive, and then start the VM again to boot into your new Windows instance:

Once Windows is running, you'll want to run the VirtIO and QEMU Guest Agent wizards from the VirtIO virtual drive you have mounted:

screenshot-pve2_8006-2024.06.02-16_22_30

screenshot-pve2_8006-2024.06.02-16_23_41

Once those VirtIO drivers are installed you should have Internet access, and can proceed with getting Windows ready for use. Here are the things I typically do:

  • "Rename this PC" to my desired name from the Windows assigned name.
  • Make sure the network I'm attached to is set to private not public.
  • Enable Remote Desktop.
  • Check for updates.
  • Install Tailscale.
  • Turn off User Account Control.
  • Activate Windows. (PCWorld Shop is a good source for discount Activation Keys):

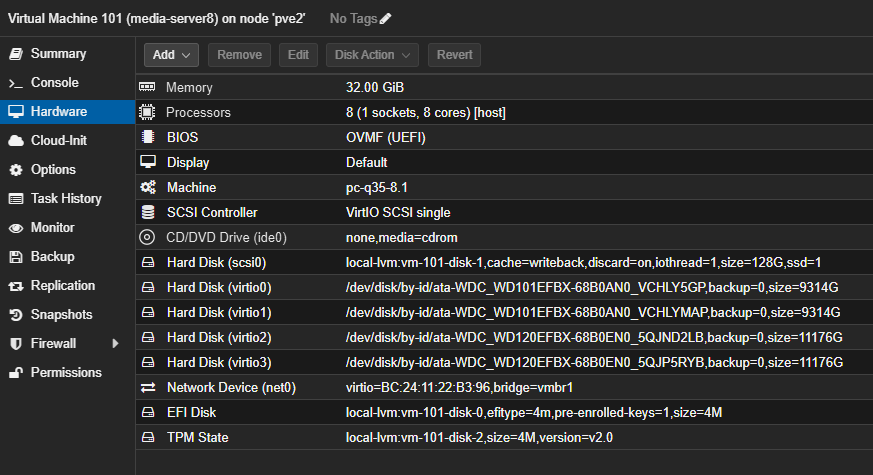
Next you'll want to pass-through the drives you want to use for your Samba shares on this new virtual NAS. In the Proxmox WebUI we'll take a look at "Disks" shown under pve, to see what we have to work with:

I'll be changing drives later, but for now /dev/sda and /dev/sdb are the two drives I want to passthrough. We'll want to use the disk IDs, rather than sda and sdb, as the IDs never change. To get those values, go to the pve shell and run:

root@pve2:~# ls -la /dev/disk/by-id | grep -E 'sda|sdb'
lrwxrwxrwx 1 root root   9 Jun  2 15:24 ata-WDC_WD101EFBX-68B0AN0_VCHLY5GP -> ../../sda
lrwxrwxrwx 1 root root  10 Jun  2 15:24 ata-WDC_WD101EFBX-68B0AN0_VCHLY5GP-part1 -> ../../sda1
lrwxrwxrwx 1 root root  10 Jun  2 15:24 ata-WDC_WD101EFBX-68B0AN0_VCHLY5GP-part2 -> ../../sda2
lrwxrwxrwx 1 root root   9 Jun  2 15:24 ata-WDC_WD101EFBX-68B0AN0_VCHLYMAP -> ../../sdb
lrwxrwxrwx 1 root root  10 Jun  2 15:24 ata-WDC_WD101EFBX-68B0AN0_VCHLYMAP-part1 -> ../../sdb1
lrwxrwxrwx 1 root root  10 Jun  2 15:24 ata-WDC_WD101EFBX-68B0AN0_VCHLYMAP-part2 -> ../../sdb2
lrwxrwxrwx 1 root root   9 Jun  2 15:24 wwn-0x5000cca0b0d6b3b5 -> ../../sda
lrwxrwxrwx 1 root root  10 Jun  2 15:24 wwn-0x5000cca0b0d6b3b5-part1 -> ../../sda1
lrwxrwxrwx 1 root root  10 Jun  2 15:24 wwn-0x5000cca0b0d6b3b5-part2 -> ../../sda2
lrwxrwxrwx 1 root root   9 Jun  2 15:24 wwn-0x5000cca0b0d6b563 -> ../../sdb
lrwxrwxrwx 1 root root  10 Jun  2 15:24 wwn-0x5000cca0b0d6b563-part1 -> ../../sdb1
lrwxrwxrwx 1 root root  10 Jun  2 15:24 wwn-0x5000cca0b0d6b563-part2 -> ../../sdb2

Either the ata- ID or the wwn- ID can be used, but the ata- value is more human readable with the disk model and serial number included -- so I'll use that:

From the pve shell, we'll use qm to add each drive to our VM:

root@pve2:~# qm set 101 -virtio0 /dev/disk/by-id/ata-WDC_WD101EFBX-68B0AN0_VCHLY5GP
update VM 101: -virtio0 /dev/disk/by-id/ata-WDC_WD101EFBX-68B0AN0_VCHLY5GP
root@pve2:~# qm set 101 -virtio1 /dev/disk/by-id/ata-WDC_WD101EFBX-68B0AN0_VCHLYMAP
update VM 101: -virtio1 /dev/disk/by-id/ata-WDC_WD101EFBX-68B0AN0_VCHLYMAP

With the drives passed-through, DrivePool can be installed and configured to create a single virtual drive. On that virtual drive, create a folder called "dvr" and share it to "Everyone" with full permissions.

To recap, we now have the following up-and-running:

  • Proxmox 8.x as a virtualization hypervisor
  • A Proxmox LXC running Docker and Portainer
  • A Proxmox VM running Windows 11 with DrivePool as our virtual NAS

Next post I'll run through adding Channels DVR via Docker (which could also be added via our Windows VM if preferred), OliveTin-for-Channels and deploy a source for Channels using OliveTin's Project One-Click.

Also reserved for future use.

Might be a good idea for a Discourse Wiki post?

Post #2 in this thread has been updated to show an example of the process to create a virtual NAS to use with Channels DVR. In this example, I'm creating a Windows VM, adding DrivePool to allow for pooling disks into a single large drive, and sharing that drive via Samba. Later I'll add Veeam Backup and Replication to create a centralized backup server for automated Windows and Linux client backups:

@bnhf Thanks for this post! But especially thanks for the tip on Helper Scripts site. I was poking around the site and lo & behold, there's a Channels script. I was curious, so ran it and yup, it builds an LXC w/ Debian, Docker, & Channels in one fell swoop!

I'm really just getting started w/ Proxmox and still wrapping my head around things, so this site is just what I needed.

1 Like

Ditto. Really appreciate the detailed instructions. I'm about to fire up a Proxmox server so I can P2V some old windows laptops and recycle them as ChromeOS machines. I'll probably also spin up a TrueNAS Scale VM to provide a NAS and retire an old QNAP NAS (which runs my back up Channels server).

Once I get that done, I might consider migrating Channels to a Proxmox VM although I'm probably more comfortable keeping a physical machine assigned to that duty. Perhaps a Channels DVR Proxmox VM would be a back up?

1 Like

So, the more I learn/play with PVE, the more I love it. I've been using the Channels LXC from that site, gave it 3 CPUs, 1GB RAM and haven't had any issues. (PVE host is i5-1235u for ref).

I played w/ TrueNAS and it was fine, but it seemed like overkill in my case since I'm running PVE on a UGREEN NAS. I actually ended up following this and setting up mountpoints for the various LXCs I'm running. Proxmox Homelab Series I only followed it up to the mountpoint info, as I'm not running any of the ARR stuff. I also didn't do any of the Hardware passthru stuff as it seems to work for me by default.

So far, I'm really liking the overall setup, it's lightweight and spinning up extra CDVR LXCs is as easy as running the helper script again.