Now that there are a host of excellent Docker-based extensions for Channels DVR, @mjitkop and @bnhf thought it was about time we had an excellent way to install them! Specifically, an all-in-one "one-click" approach that would spin-up the container and do the Custom Channels setup as well.
OliveTin and Portainer were perfect for this project, and are prerequisites. OliveTin provides the user interface for the minimal set of values you need to provide and Portainer, with its API, allows for the creation of a stack that can be modified in the future if needed. A CDVR Custom Channels source is created with a custom starting channel number (if desired), and guide data is downloaded.
From that first click in OliveTin, to watching TV using your new source is typically a matter of a few minutes. No searching the forum for the bits and pieces need to get it running. 
The following extensions are currently supported:
- ADBTuner
- ah4c
- cc4c
- ChannelsDVR
- EPlusTV
- Filebot
- FrndlyTV-for-Channels
- MediaInfo
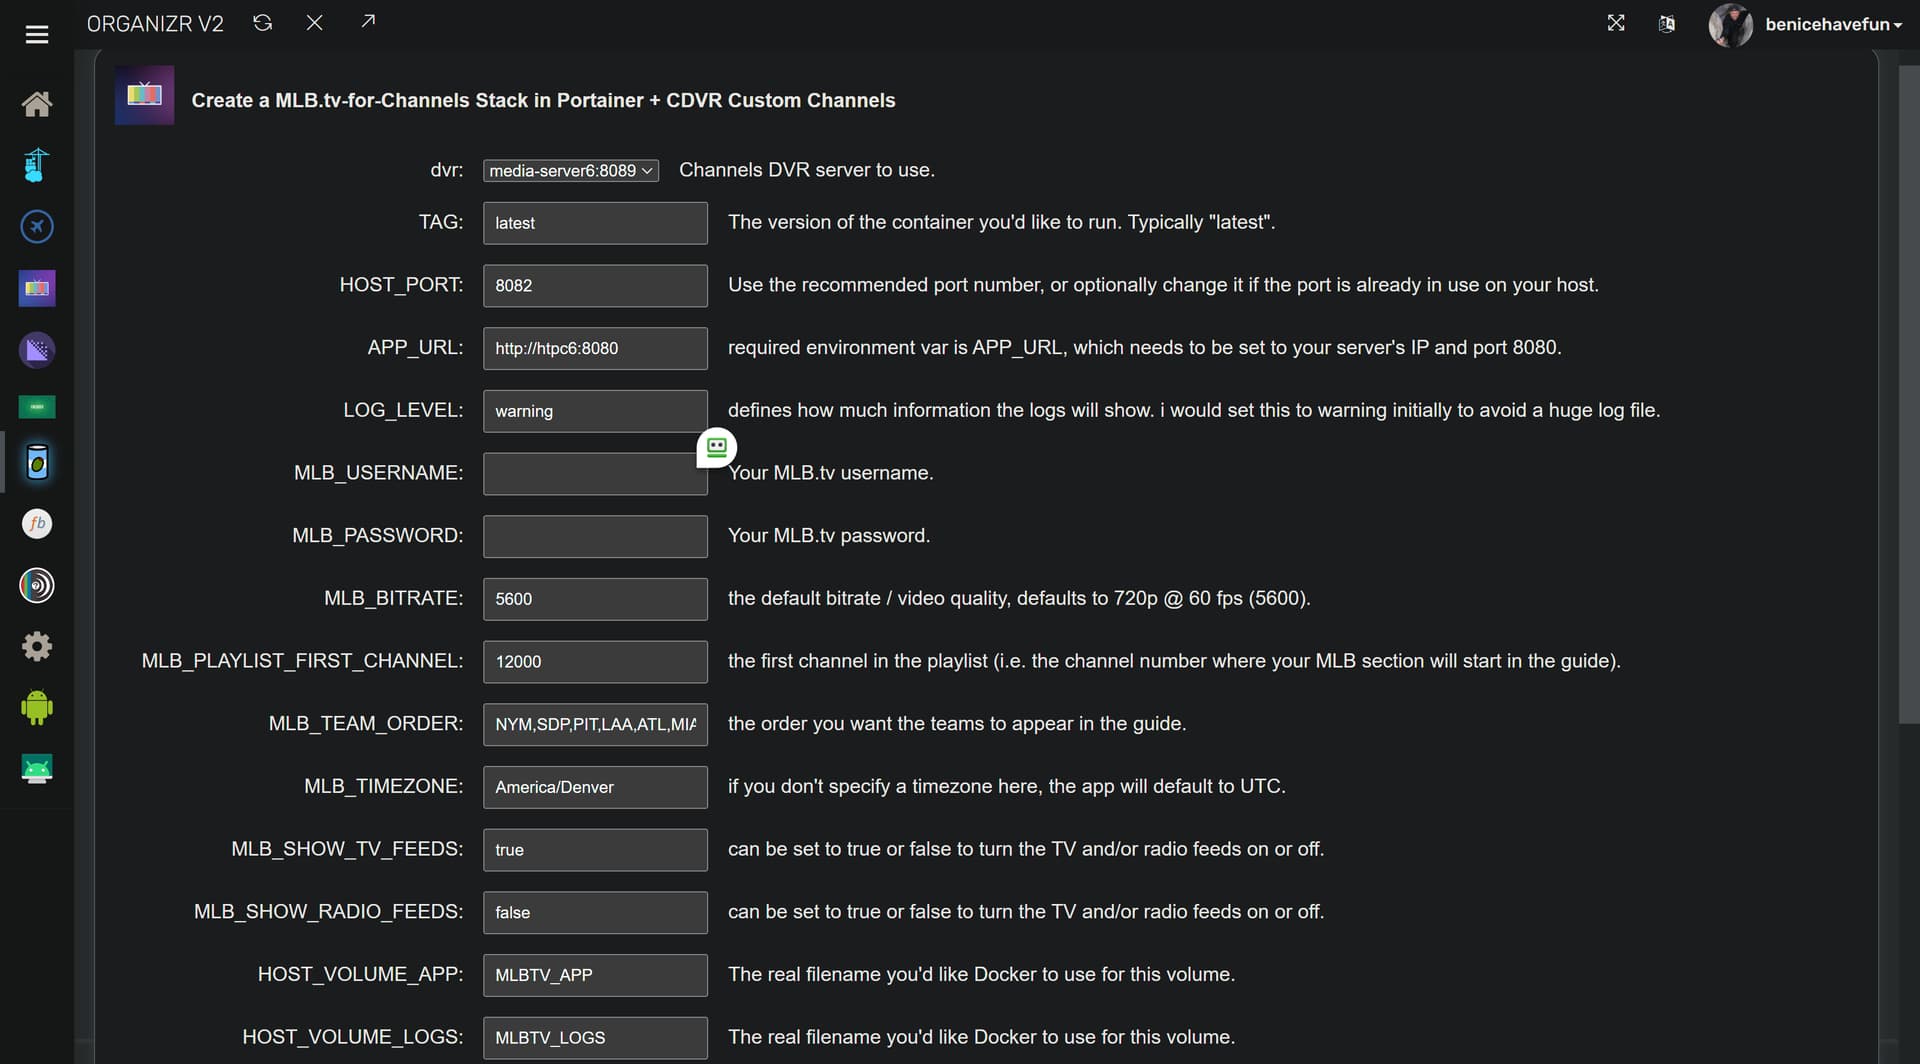
- MLB.tv-for-Channels
- mlbserver
- Organizr
- Plex-for-Channels
- Pluto-for-Channels
- Samsung-TVPlus-for-Channels
- Stirr-for-Channels
- Threadfin
- TubeArchivist
- Tubi-for-Channels
- VLC-Bridge-Fubo
- VLC-Bridge-PBS
- Watchtower
Here are few images of the process for FrndlyTV:
Project One-Click Actions menu (accessed via the hamburger icon, upper-left corner OliveTin WebUI) :

FrndlyTV Action button:

OliveTin "stdout" showing success with the stack and custom channels source creation:

The new frndlytv-for-channels Docker container up-and-running:

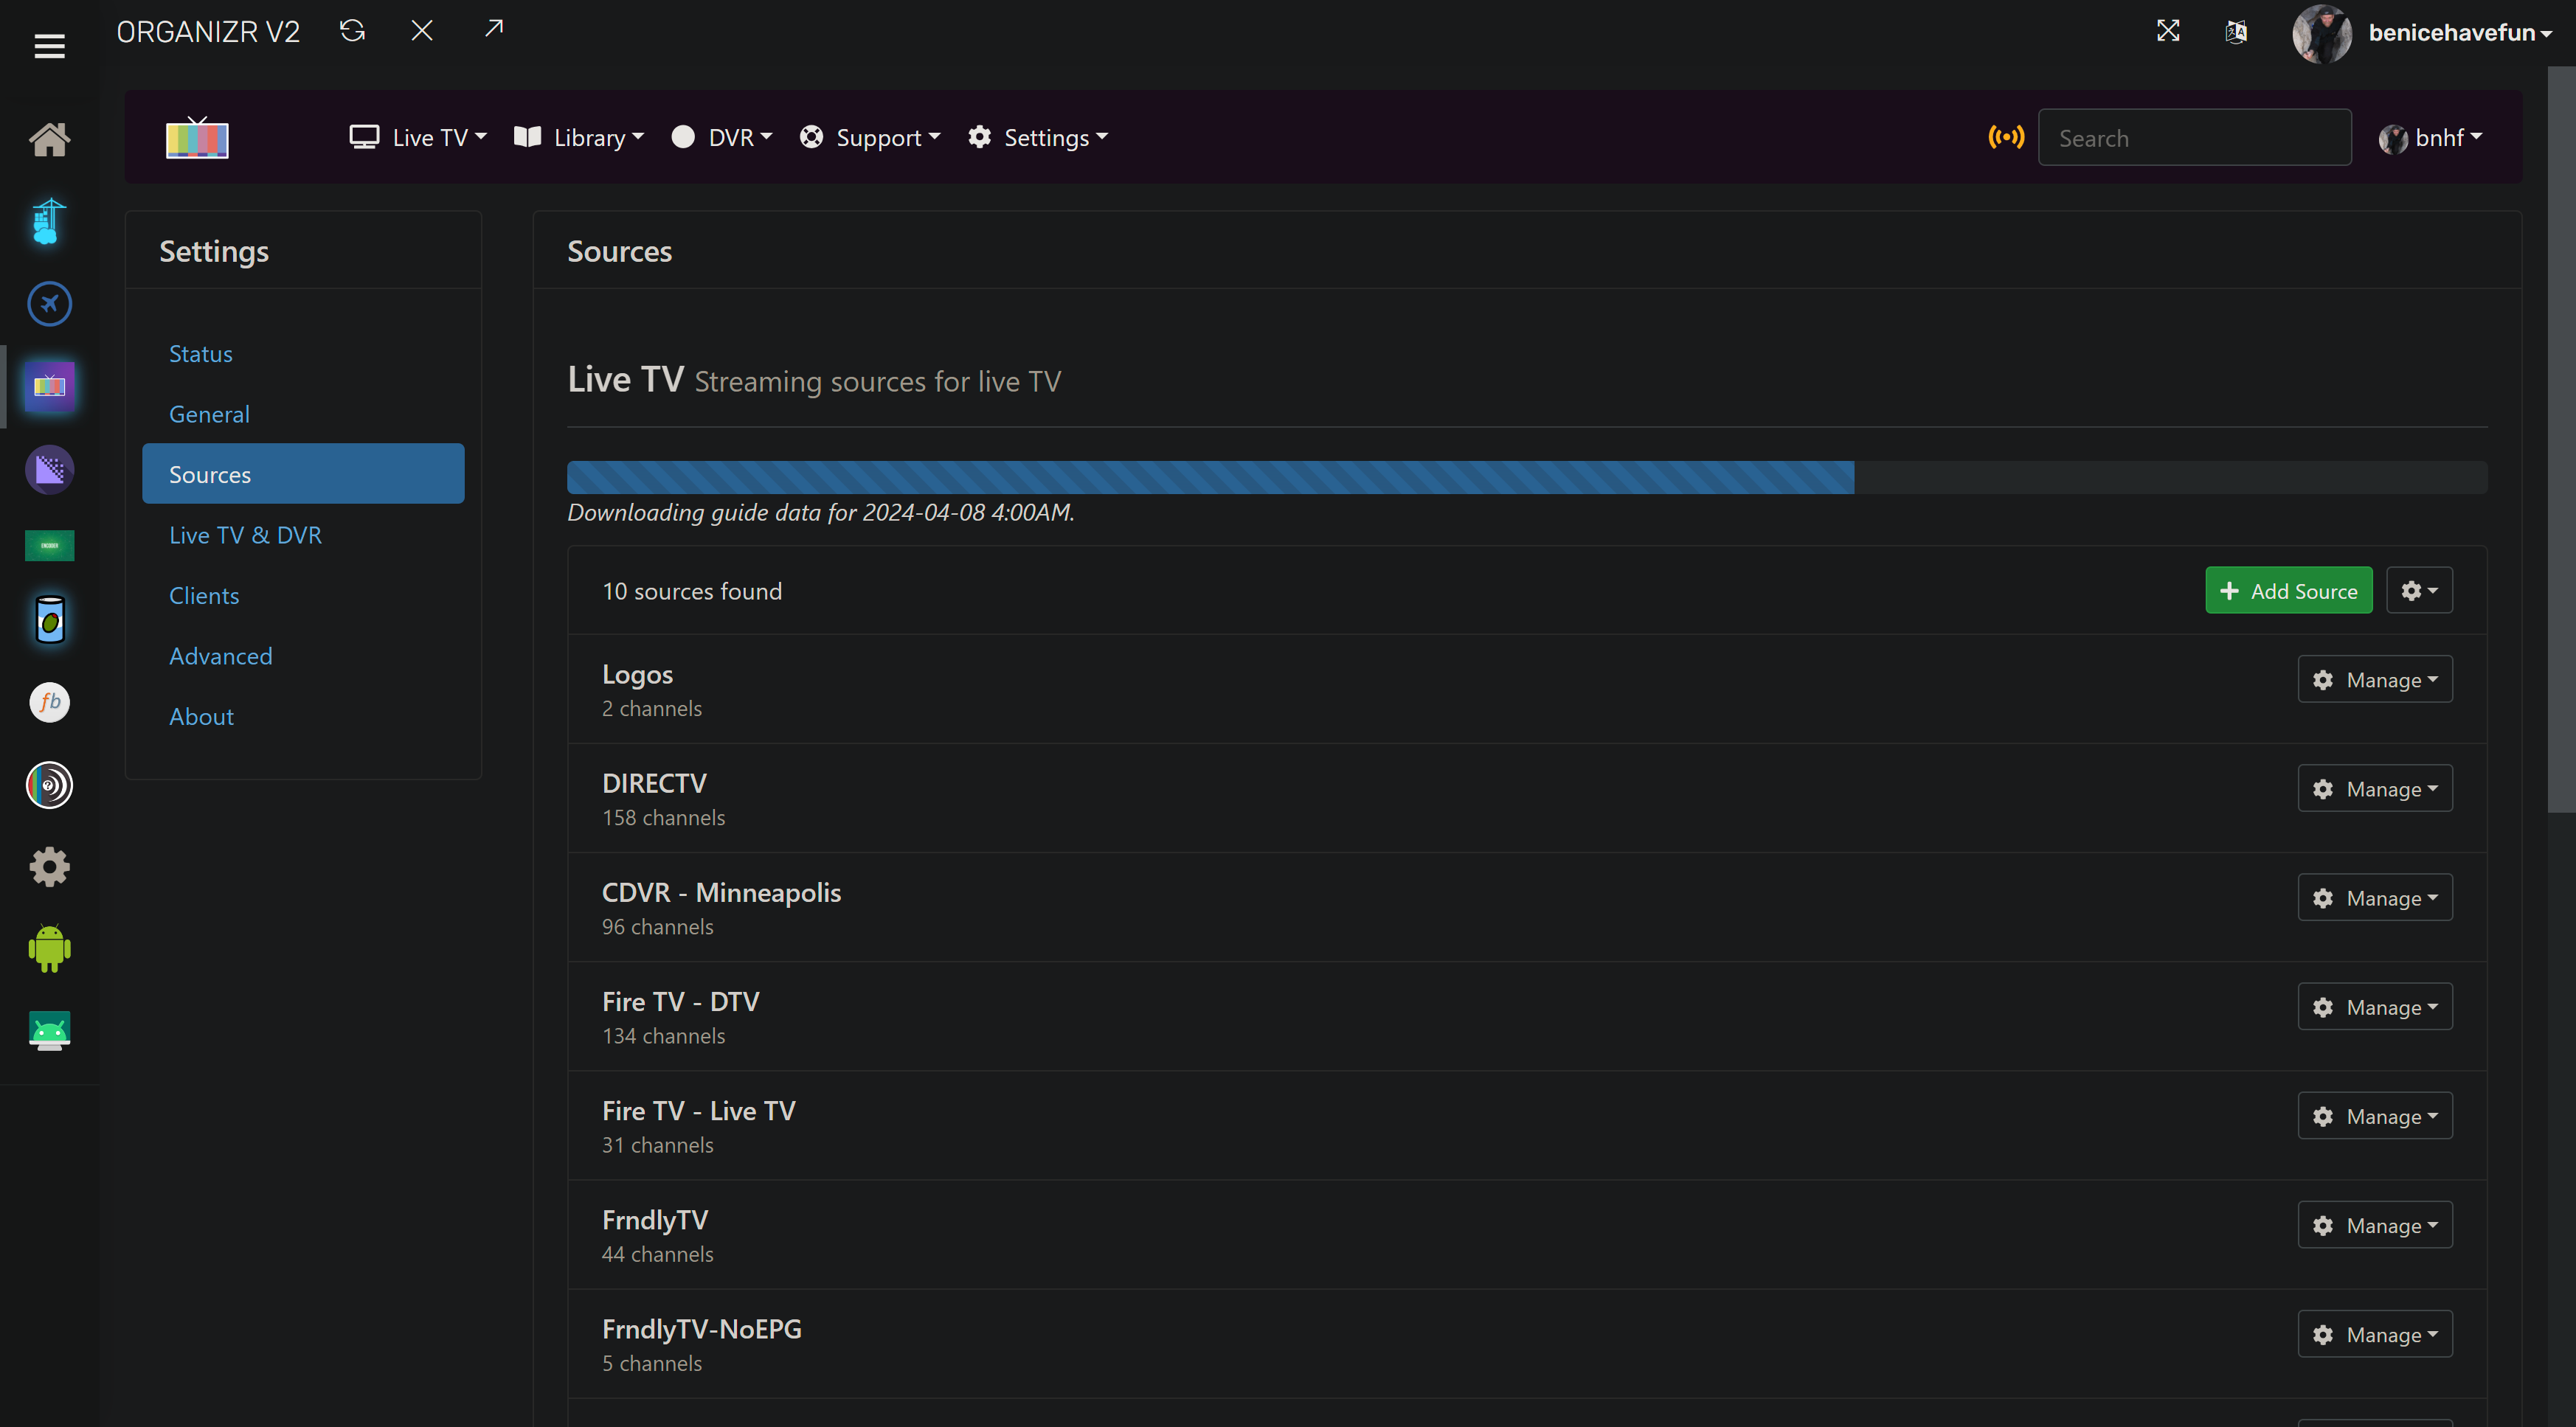
The Channels DVR Custom Channels setup (including the special two source setup for FrndlyTV) done for you, with guide data on its way:
And, the guide populated:

Watching FrndlyTV:

Elapsed time -- maybe two minutes!
To get this going for yourself, you'll need to install Portainer and OliveTin. In addition, you'll need to create a Portainer API Token:
OliveTin installation described here:
Portainer API Token is just a couple of steps. First go to My account:

Next create a token with the name OliveTin, and copy it -- this is the only time you'll see it:

Your OliveTin Portainer-Stack requires a couple of new environment variables, PORTAINER_TOKEN and PORTAINER_HOST:
version: '3.9'
services:
  olivetin: # This docker-compose typically requires no editing. Use the Environment variables section of Portainer to set your values.
    # 2025.03.27
    # GitHub home for this project: https://github.com/bnhf/OliveTin.
    # Docker container home for this project with setup instructions: https://hub.docker.com/r/bnhf/olivetin.
    image: bnhf/olivetin:${TAG:-latest} # Add the tag like latest or test to the environment variables below.
    container_name: ${OLIVETIN_NAME:-olivetin}${EZ_START}
    hostname: ${OLIVETIN_NAME:-olivetin}${EZ_START}
    dns_search: ${DOMAIN:+${DOMAIN}} # For Tailscale users using Magic DNS, add your Tailnet (tailxxxxx.ts.net) to use hostnames for remote nodes, otherwise use your local domain name.
    ports:
      - ${HOST_PORT:-1337}:1337
    environment:
      - OLIVETIN_COMPOSE=2025.03.26${EZ_START} # Do not change this value.
      - CHANNELS_DVR=${CHANNELS_DVR_HOST}:${CHANNELS_DVR_PORT:-8089} # Add your Channels DVR server in the form CHANNELS_DVR_HOST=<hostname or ip> and CHANNELS_DVR_PORT=<port>.
      - ${CHANNELS_DVR2_HOST:+CHANNELS_DVR_ALTERNATES=${CHANNELS_DVR2_HOST}:${CHANNELS_DVR2_PORT}} ${CHANNELS_DVR3_HOST:+${CHANNELS_DVR3_HOST}:${CHANNELS_DVR3_PORT}} # Space separated list of alternate Channels DVR servers to choose from in the form hostname:port or ip:port.
      - CHANNELS_CLIENTS=${CHANNELS_CLIENTS} # Space separated list of Channels DVR clients you'd like notifications sent to in the form hostname or IP.
      - ALERT_SMTP_SERVER=${ALERT_SMTP_SERVER} # SMTP server to use for sending alert e-mails. smtp.gmail.com:587 for example.
      - ALERT_EMAIL_FROM=${ALERT_EMAIL_FROM} # Sender address for alert e-mails.
      - ALERT_EMAIL_PASS=${ALERT_EMAIL_PASS} # SMTP "app" password established through GMail or Yahoo Mail. Do not use your everyday e-mail address.
      - ALERT_EMAIL_TO=${ALERT_EMAIL_TO} # Recipient address for alert e-mails.
      - UPDATE_YAMLS=${UPDATE_YAMLS:-true} # Set this to true to update config.yaml.
      - UPDATE_SCRIPTS=${UPDATE_SCRIPTS:-true} # Set this to true to update all included scripts.
      - TZ=${TZ} # Add your local timezone in standard linux format. E.G. US/Eastern, US/Central, US/Mountain, US/Pacific, etc.
      - PORTAINER_TOKEN=${PORTAINER_TOKEN} # Generate via <username> dropdown (upper right of WebUI), "My account", API tokens.
      - PORTAINER_HOST=${PORTAINER_HOST:-$CHANNELS_DVR_HOST} # Hostname or IP of the Docker host you're running Portainer on.
      - PORTAINER_PORT=${PORTAINER_PORT:-9443} # https port you're running Portainer on. 9443 is the default.
      - PORTAINER_ENV=${PORTAINER_ENV:-2} # Set this is if you're using an alternate Portainer Environment for some reason. 2 is the default.
      - PERSISTENT_LOGS=${PERSISTENT_LOGS:-false} # For supported Actions, log files are retained on an ongoing basis. false is the default.
    volumes:
      - ${HOST_DIR:-/unused}${HOST_DIR:+/olivetin:/config} # Add the parent directory on your Docker you'd like to use.
      - ${DVR_SHARE:-/unused}${DVR_SHARE:+:/mnt/${CHANNELS_DVR_HOST}-${CHANNELS_DVR_PORT}} # This can either be a Docker volume or a host directory that's connected via Samba or NFS to your Channels DVR network share.
      - ${LOGS_SHARE:-/unused}${LOGS_SHARE:+:/mnt/${CHANNELS_DVR_HOST}-${CHANNELS_DVR_PORT}_logs} # This can either be a Docker volume or a host directory that's connected via Samba or NFS to your Channels DVR logs network share.
      - ${TUBEARCHIVIST_SHARE:-/unused}${TUBEARCHIVIST_SHARE:+:/mnt/${CHANNELS_DVR_HOST}-${CHANNELS_DVR_PORT}_ta} # This can either be a Docker volume or a host directory that's connected via Samba or NFS to your TubeArchivist videos network share.
      - ${DVR2_SHARE:-/unused}${DVR2_SHARE:+:/mnt/${CHANNELS_DVR2_HOST}-${CHANNELS_DVR2_PORT}} # Note that these volume mounts should always be to /mnt/hostname-port or /mnt/ip-port (dash rather than a colon between).
      - ${LOGS2_SHARE:-/unused}${LOGS2_SHARE:+:/mnt/${CHANNELS_DVR2_HOST}-${CHANNELS_DVR2_PORT}_logs} # This can either be a Docker volume or a host directory that's connected via Samba or NFS to your Channels DVR logs network share.
      - ${TUBEARCHIVIST2_SHARE:-/unused}${TUBEARCHIVIST2_SHARE:+:/mnt/${CHANNELS_DVR2_HOST}-${CHANNELS_DVR2_PORT}_ta} # This can either be a Docker volume or a host directory that's connected via Samba or NFS to your TubeArchivist videos network share.
      - ${DVR3_SHARE:-/unused}${DVR3_SHARE:+:/mnt/${CHANNELS_DVR3_HOST}-${CHANNELS_DVR3_PORT}} # Note that these volume mounts should always be to /mnt/hostname-port or /mnt/ip-port (dash rather than a colon between).
      - ${LOGS3_SHARE:-/unused}${LOGS3_SHARE:+:/mnt/${CHANNELS_DVR3_HOST}-${CHANNELS_DVR3_PORT}_logs} # This can either be a Docker volume or a host directory that's connected via Samba or NFS to your Channels DVR logs network share.
      - ${TUBEARCHIVIST3_SHARE:-/unused}${TUBEARCHIVIST3_SHARE:+:/mnt/${CHANNELS_DVR3_HOST}-${CHANNELS_DVR3_PORT}_ta} # This can either be a Docker volume or a host directory that's connected via Samba or NFS to your TubeArchivist videos network share.
      - /var/run/docker.sock:/var/run/docker.sock
    restart: unless-stopped

  static-file-server:
    image: halverneus/static-file-server:latest
    container_name: ${SFS_NAME:-static-file-server}${EZ_START}
    dns_search: ${DOMAIN}
    ports:
      - ${HOST_SFS_PORT:-0}:8080
    environment:
      - FOLDER=${FOLDER:-/web}
    volumes:
      - ${HOST_DIR:-/unused}${HOST_DIR:+/olivetin/data:${FOLDER:-/web}}
    restart: unless-stopped

#0#volumes: # Remove the #x# to enable. Use this section if you've setup a docker volume named channels-dvr, with CIFS or NFS, to bind to /mnt/dvr inside the container. Set ${DVR_SHARE} to channels-dvr (DVR_SHARE=channels_dvr) in that example.
  #1#channels-dvr:
    #1#external: true
  #2#channels-dvr-logs:
    #2#external: true
  #3#tubearchivist:
    #3#external: true
  #4#channels-dvr2:
    #4#external: true
  #5#channels-dvr2-logs:
    #5#external: true
  #6#tubearchivist2:
    #6#external: true
  #7#channels-dvr3:
    #7#external: true
  #8#channels-dvr3-logs:
    #8#external: true
  #9#tubearchivist3:
    #9#external: true
Sample env vars:
TAG=latest
DOMAIN=localdomain tailxxxxx.ts.net
HOST_PORT=1337
CHANNELS_DVR_HOST=local-server
CHANNELS_DVR_PORT=8089
CHANNELS_DVR2_HOST=another-server
CHANNELS_DVR2_PORT=8089
CHANNELS_DVR3_HOST=a-third-server
CHANNELS_DVR3_PORT=8089
CHANNELS_CLIENTS=appletv4k firestick-master amazon-aftkrt
ALERT_SMTP_SERVER=smtp.gmail.com:587
[email protected]
ALERT_EMAIL_PASS=xxxxxxxxxxxxxxxx
[email protected]
UPDATE_YAMLS=true
UPDATE_SCRIPTS=true
TZ=US/Mountain
HOST_DIR=/data
DVR_SHARE=/mnt/dvr
LOGS_SHARE=/mnt/channelsdvr
TUBEARCHIVIST_SHARE=/mnt/dvr
DVR2_SHARE=
LOGS2_SHARE=
TUBEARCHIVIST2_SHARE=
DVR3_SHARE=
LOGS3_SHARE=
TUBEARCHIVIST3_SHARE=
HOST_SFS_PORT=8080
FOLDER=/web
PORTAINER_TOKEN=xxxxxxxxxxxxxxxxxxxxxxxxxxxxxxxxxxxxxxxx
PORTAINER_HOST=docker-host
PORTAINER_PORT=9443
PORTAINER_ENV=2
PERSISTENT_LOGS=false